


Accidentally deleted some important files? Here’s how to recover photos, documents and more with data recovery software.

Accidentally deleting files is easy to do and you may not even realise you’ve done it until you need the file again. Fortunately, you might be able to get them back with data recovery software.
Even though Windows may not be able to see files you delete, they are usually still there and are able to be retrieved. However, the quicker you act the more chance you’ll have of recovering them. And if you’ve already got recovery software installed, it’s better still.
But if your files were on an SSD, then it’s bad news. They work differently from hard drives and USB flash drives as they perform housekeeping to clear out unused cells. Although many recovery utilities will include SSDs in the list of media they can recover from, the likelihood is that any retrieved files will be corrupt.
There are free and paid options, but you need to be careful before installing and using them because you might overwrite the very files you are trying to get back.
Most file recovery utilities work the same way, and we’ll recommend some free and paid-for options below. Here’s the basic process
- Download the recovery software. Install it to a different hard drive from the one containing the deleted files if possible.
- Select the disk or card containing your deleted files and allow the tool to scan for missing files
- Select the files to recover
- Choose a save location, which must be different to the original location
For more in-depth instructions jump to our walkthrough on how to recover deleted files.
The first thing you should do is check the Windows’ Recycle Bin if you’ve just deleted something you didn’t mean to. When you select a file and press the Delete key (or right-click and choose the Delete option from the menu), Windows makes no attempt to delete it at all.
Instead, it moves it to the Recycle Bin, which has its own icon on the desktop. Restoring a file from the Recycle Bin is a simple matter of double-clicking on the desktop icon to display the contents and then right-clicking on the file and selecting Restore from the menu.
If the Recycle bin icon isn’t there, search in the Start menu for ‘Show or Hide’ and you should see a shortcut to the settings where you can tick the box next to the Recycle Bin and make it appear.
Don’t rely on the Recycle Bin as a safety net, though: it has a size limit and once you exceed that, older files will be deleted permanently and automatically. The default size is more than adequate for most people so there’s a very good chance that any files you want to restore will still be present in the Recycle Bin. To check the capacity or alter it, right click on the Recycle Bin and choose Properties.
However, if you’re in the habit of using the Shift-Delete shortcut which bypasses the Recycle Bin and actually deletes the data, then this won’t help. Plus, if your files were on an SD card or USB flash drive there is no Recycle Bin function.
But before resorting to file recovery software, it is still worth checking other avenues. Have you shared the file or document via email? Have you saved or synchronised it with a cloud storage service? Or have you been sensible and made a backup of the files on another hard drive?
No? Well fear not, because there are plenty of data recovery utilities which might be able to bring them back.
Free vs paid data recovery software
Here are some free options. Recuva – from Piriform – tends to be the go-to option for many people.
- Recuva
- Paragon Rescue Kit 14 Free
- CGSecurity PhotoRec
- Minitool Partition Wizard Free Edition 9.1
- Kroll Ontrack EasyRecovery Free
- TestDisk
On some occasions, a free tool is all you’ll need. But many of these have limited power for recovering files, or are limited in the number of files or the amount of data they will recover before you have to pay for their more powerful, deeper-scanning versions. Often, these premium versions can find and restore files that the free versions can’t. For example, if you format a hard drive (the long option, not the Quick one) then you might find free recovery software can still get the files back.
Here are three of the best paid options, most of which offer a trial version or at least will display the files available for recovery before you have to pay:
- Stellar Phoenix Windows Data Recovery – from £29.99 / US$29.99
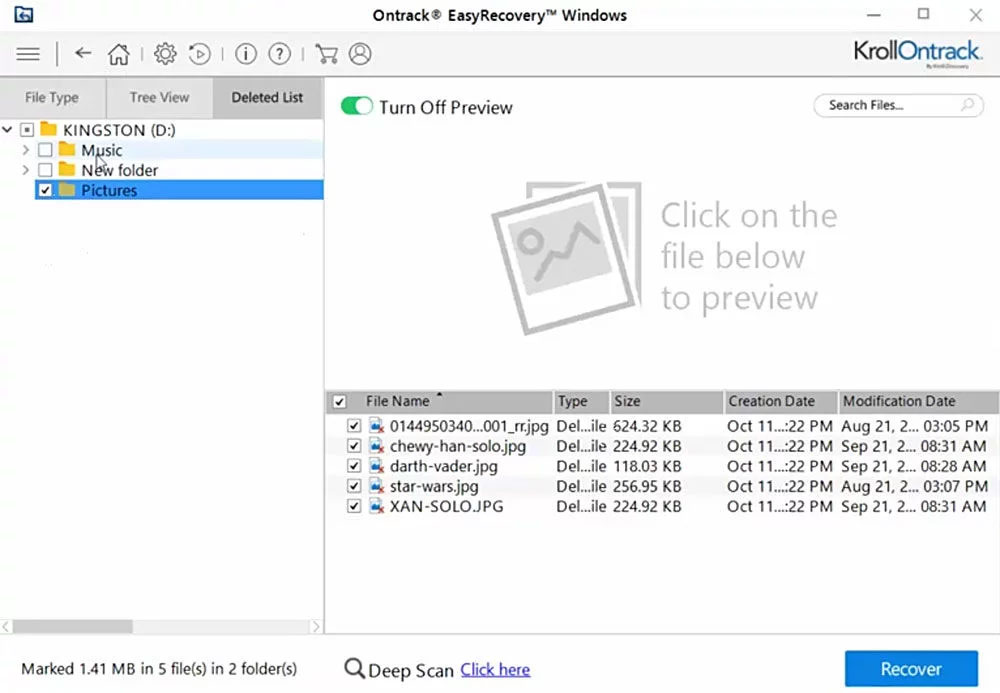
- Kroll Ontrack EasyRecovery – £69 / US$98
- Disk Drill (formerly Pandora Recovery) – £39 / US$39
Tips for recovering deleted files
Act fast! The sooner you realise you’ve accidentally deleted a file, the better your chances of recovering it. When you notice your loss, don’t save anything to the disk and don’t even download or install a file recovery utility if the file was on your PC or laptop’s hard drive as it might overwrite the very files you’re trying to recover.
Use the portable version. Some recovery software can run directly from a USB flash drive but you must download it using a different computer. Even browsing the internet to find an undelete utility causes files to be written to your disk so use a different PC to download the utility.
Free up some space. Undelete utilities only work reliably with sequential files. If your disk is reasonably full, Windows often has to split the file across spare blocks around the disk and in this case, a deleted file is very difficult to recover.
Plus, different types of drive use different file systems and any undelete utility will work only with particular types of file system. Hard disks in Windows PCs use the NTFS file system but USB flash drives and memory cards usually use some variant of FAT (FAT16, FAT32 or exFAT) and you should select software with the necessary support for all your media.
Can files be recovered from a failed SSD or hard drive?
Having dispelled the myth that deleted and corrupted files are lost forever, we now come to the problem that all PC users dread – a hard disk failure. This could manifest in several ways but generally Windows won’t start, even in Safe Mode, and turning on your PC might be accompanied by unhealthy clicking noises. What you stand to lose, therefore, isn’t just a few of your treasured files but the entire contents of the disk.
It’s commonly suggested that hard disks can be repaired by putting them in the freezer. While this has been known to work, bringing the drive back to life for just long enough to extract the most important files, it’s effective only for certain very specific types of fault.
Often it won’t work and attempting it might just prove to be the last straw for your ailing disk. Our recommendation, therefore, is that you don’t attempt this nor any other DIY repair.
Instead, as soon as you suspect a hardware failure, turn off your PC immediately and make contact with a data recovery company such as Kroll OnTrack. These companies have vast stocks of parts that they are able to swap in their clean room to restore a disk to a working state.
Once this has been achieved they’ll copy all the data they can recover to encrypted removable media such as a USB drive. This will work for failures of most parts of the disk including the electronic circuit boards, the motor and the read/write head, but there’s a limit to what can be achieved.

As the part on which the data is actually stored, if the platter is scratched or shattered it’s normally game over although, fortunately, this is rare. As always, it pays to shop around before deciding which company to use and it’s also a good idea to choose a company that will diagnose the problem for free.
The technicians can also use the latest techniques to recover data from a failed SSD.
Expect to pay around £700 / US$700 for such as service though, so it’s really a last resort or for data that’s extremely valuable.
How to recover deleted files
We’ve used Disk Digger here, but the process is similar with all recovery software.
Step 1.Download Disk Digger. You don’t need to install it – just extract the contents of the .zip archive and run the .exe file. Remember that if you’ve already accidentally deleted some files, you shouldn’t download DiskDigger to the disk containing your lost files as it could overwrite your files and make it impossible to recover them. Ideally, download it before you actually need it.
Step 2. Start DiskDigger. The opening screen shows all the disks so select the one containing your deleted files and click on ‘Next’ three times. The disk will now be scanned and any deleted files will be listed – this could take some time. If your missing files are listed, continue to the next step. If not you could try altering some of the options in the earlier screens.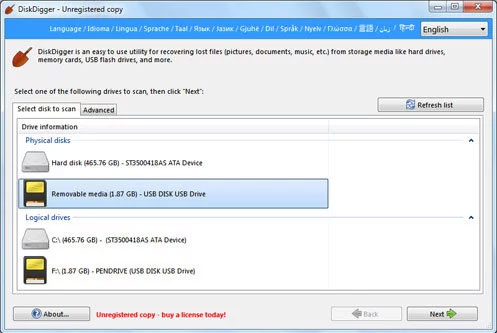
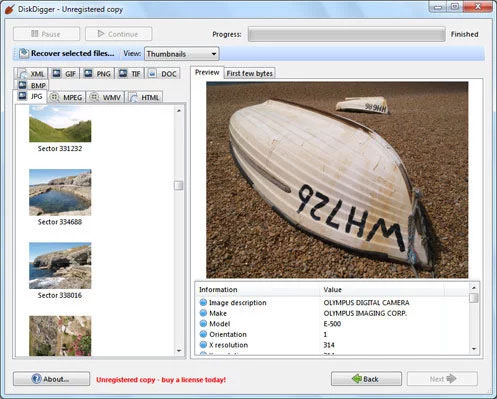
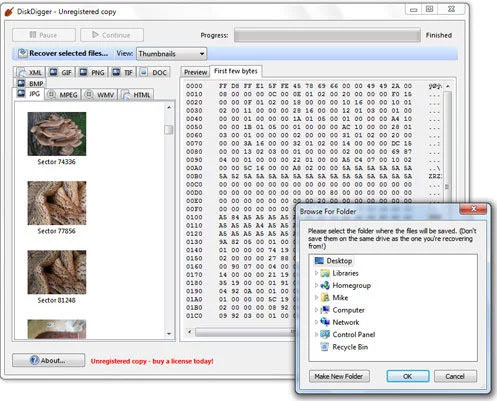
Step 3. DiskDigger won’t be able to show correct filenames so, to help identify lost files, a preview option is provided. Select a file in the list at the left and choose either the ‘Preview’ (for photos) or the ‘First few bytes’ tag. Also useful for photographs is the ‘Thumbnail’ option in the ‘View’ menu which will show small images in the list.
Step 4. When you’ve identified your lost file(s) select them in the list at the left and click on ‘Recover selected files…’. Next select the device and folder where you want your files to be restored to (this must not be on the same physical drive as the lost file) and click on OK. The missing file(s) will be saved with automatically generated filenames, so you’ll need to rename them to their original names or something meaningful. (See also: How to erase a write-protected USB drive or SD card.)


