


The public beta of iOS 12 is due out soon, but early adopters may regret their decision. Here’s how to go back to iOS 11 without losing your stuff.
If you’ve upgraded to iOS 12 and got cold feet, it’s possible to downgrade, but be quick.
There are two main ways to do it, one of which requires you to have a backup and the other which – fortunately – doesn’t. Here’s how to go back to iOS 11.
How to downgrade iOS: Method 1 – no backup needed*
* You may lose your text messages, but all other settings and apps will remain after the downgrade
- Download the appropriate IPSW file for your iPhone or iPad.
- Make sure iTunes on your computer is the latest version. If not, download and install it.
- Connect your iPhone or iPad to your computer and then click on your device when it appears.
- Under the Summary section, click the Check for Updates button while holding Shift (Windows) or Option (Mac).
- Now navigate to and choose the IPSW file you downloaded.
- Your device will be ‘updated’ to iOS 11.
As we said, the process will downgrade your phone or iPad without deleting all your stuff, but you will lose any text messages. So next time you upgrade, either make a full backup or don’t upgrade!
How to downgrade iOS: Method 2 – using a backup you already have
Not unreasonably, Apple doesn’t encourage downgrading to a previous version of iOS, but it is possible.
Currently Apple’s servers are still signing iOS 11.3.1 and 11.4. You can’t go back any further, unfortunately, which could be an issue if your most recent backup was made while running an older version of iOS.
Let’s be clear: you can only restore a backup which was made while your phone or tablet was running iOS 11.3.1 or 11.4.
Our Macworld UK colleagues have a great guide to how to back up an iPhone, here. The key thing is to make sure you always have an up-to-date full backup, which is why it’s best to do a full password-protected backup via iTunes. You can also back up to iCloud to get a second chance of recovering your contacts, photos and other things.
Step 1.
To reinstall iOS 11 you need the relevant .ipsw file for your model of iPhone or iPad. Older versions won’t work as they’re not being ‘signed’ – or approved – by Apple’s servers.
(Mac users, if the ipsw file is stored on your Mac hard drive you can find it by following the path youruserfolder/Library/iTunes/ and then within a folder called iPad Software Updates, iPhone Software Updates or iPad Software Updates.)
If you can’t find the latest one on your Mac, or your a PC user, simply run a search for ‘download ipsw’ and select and download the appropriate file for your device. There are plenty of sites to choose from, including https://ipsw.me/ which helpfully tells you which versions are currently being signed.
Step 2.
Note: If you’re reading this after the final version of iOS 12 is released to the public you will have only a short time to downgrade (in past years as little as one week after the initial release date – not the date on which you upgraded) before it becomes impossible without a jailbroken phone.
Disable the Find My iPhone/iPad feature on the device if you’ve enabled it. You’ll find it in Settings > iCloud.
Plug in to your PC or Mac your iPhone or iPad. Launch iTunes. Click on your device in the iTunes interface and select Summary. Now hold down the Alt/Option key (Shift on a PC), and click the Restore iPhone button.
Now navigate to the IPSW file on your desktop and click Open. Your PC will now reinstall iOS 11.3.1 (or iOS 11.4) on your iPad or iPhone. Or it should…
Go into Recovery mode
If iTunes says you’re already running the latest version of iOS on your device, you may need to use Recovery mode. Completely power off the device, plug one end of the syncing cable into your computer and hold down the Home button on the iPhone/iPad while you connect the cable to it. When the ‘Connect to iTunes’ screen appears, release the Home button.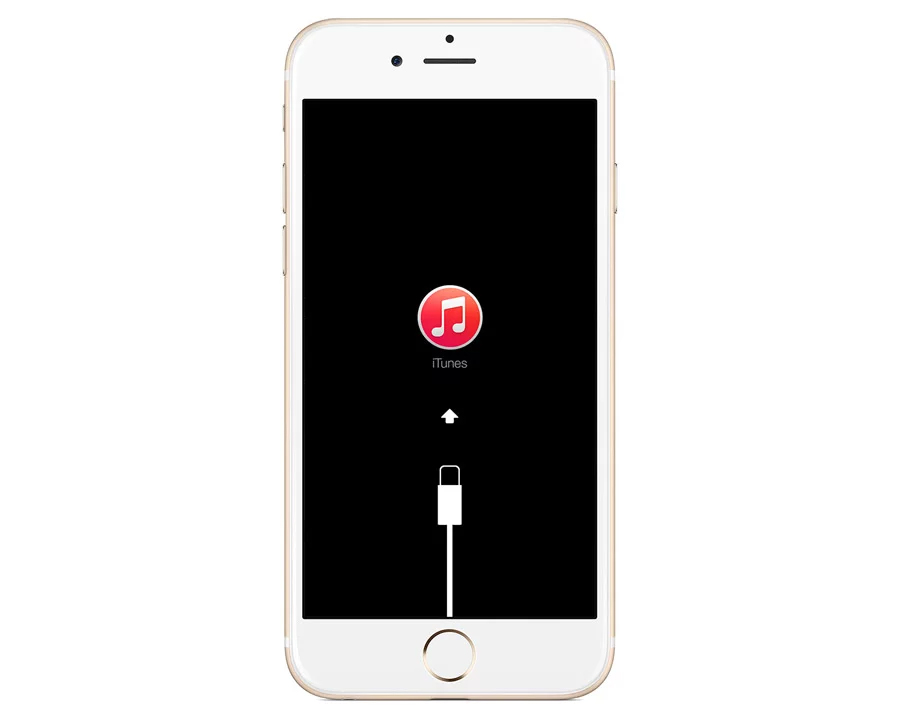 iTunes will say that your device is now in Recovery mode. Hold down the Option key (Shift on a PC), click Restore, navigate to the .ipsw file, and install it on your device.
Restore your backup
If you have managed to go back, you’ll have a near-blank iPhone with none of your stuff on it. That’s where the backup you made comes in.
In iTunes click the Restore iPhone… button and choose the appropriate backup. It may take an hour or so, but your phone will be back to the way it was when you made the backup.
If you have no backup, you’ll have to sync music, videos and other content from iTunes or iCloud. You can then go to the App Store and download anything you’ve previously purchased after logging in with your Apple ID.


